Creating lasting memories with your family is easier than you think. DIY projects like crafting classic wood games are a great way to spend quality time together. They promote bonding and fun.
These games are perfect for all ages and interests. They ensure everyone has a great time. Working together on these projects strengthens family bonds and creates a sense of togetherness.
There are many classic wood games to choose from. You can pick the ones your family loves, making it a fun and exciting experience for everyone.
The Joy of Creating Wooden Games for Family Bonding
Building wooden games is more than just making something. It’s about creating memories with your family. Working on family-friendly woodworking projects is a great way to spend time together. It brings everyone closer and builds teamwork.

The wood you choose is key for your game’s durability and look. Beginners should start with easy-to-work-with woods like pine or cedar. These are affordable, have a nice texture, and look good.
Hardwoods like oak and maple are also great for wooden games. They last long and have a classic look. But, they need more advanced tools and skills.
Must-Have Tools for Beginners
Starting woodworking can seem scary, but the right tools help a lot. Beginners should get basic tools like a saw, sandpaper, and a drill. As you get better, you can add more specialized tools.
Good tools make the work easier and safer. It’s smart to follow tips from experienced woodworkers to get better.
Choosing the right wood and tools lets you make beautiful, lasting wooden games. This not only brings fun to your family but also pride in what you’ve made together.
How to Build Classic Wood Games That Bring Family Fun Back
Building classic wood games is a great way to bond with your family. It combines fun with learning. Your kids can learn woodworking skills while making something fun.
First, pick projects that fit your kids’ age. This makes sure they can help safely and effectively.
Age-Appropriate Tasks for Kids
Young kids (ages 5-8) can start with simple tasks like sanding or painting. Kids aged 9-12 can do more, like measuring and cutting, with some help.
Teenagers (ages 13+) can do even more. They can help assemble parts or even design their own game pieces.

Wooden games are more than just fun. They’re a chance to teach important woodworking skills. Working together, you can show them how to measure, cut, and assemble.
These skills help with future projects and improve problem-solving and hand-eye coordination.
By following these steps and involving your kids, you can make classic wood games. These games bring fun back home and teach valuable skills.
Giant Wooden Jenga: A Backyard Favorite
Giant Wooden Jenga is more than a game. It’s an experience that mixes physical skill with social fun. It’s great for any backyard party or yard games event.

Setting Up for Different Age Groups
For kids, start with a stable setup or bigger blocks. This makes it easier for them to learn the game.
As kids get older, the game gets harder. Use the standard rules and block sizes for more challenge.
Indoor vs. Outdoor Play Considerations
Giant Wooden Jenga is often played outside, but it works indoors too. You need enough space for the game and players.
Playing outside is more flexible. It’s perfect for enjoying yard games at parties.
In short, Giant Wooden Jenga is fun for all ages, indoors or outdoors. It’s a great game for any family’s yard games collection.
Crafting a Wooden Tic-Tac-Toe Board
Building a wooden Tic-Tac-Toe board is a fun DIY project for kids. It’s a classic game that can be made unique with different themes. This makes it a great way to bond with your family during game nights.

Themed Tic-Tac-Toe sets can make the game more exciting for kids. You can pick a theme that your child loves, like cartoon characters or sports teams. The choice of theme can be a fun activity to do together.
Finishing Techniques for Durability
Using the right finish is key to making your wooden Tic-Tac-Toe board last. You can choose from varnish, polyurethane, or natural wax. Each option helps protect the board from damage, keeping it looking good for a long time.
Creating a wooden Tic-Tac-Toe board is more than just a game. It’s a piece of wooden accessories that can be kept as a treasure. It’s a great way to teach kids about woodworking and DIY projects. They learn new skills and feel proud of what they’ve made.
Building a Classic Wooden Checkers Board
Wooden checkers boards are great for family game nights. Building one is simple with basic tools and traditional techniques. You’ll make a beautiful board that will last for years.
First, pick the wood for your board. Use a hardwood like oak or maple for the grid. Choose a contrasting wood like walnut or cherry for the checkers. The classic 8×8 grid is popular, but you can try different designs too.
Combination Chess/Checkers Board Design
Consider making a board for both chess and checkers. You can make a reversible board. This way, you can play both games on one board. It’s ideal for those who enjoy both games.
Weatherproofing for Outdoor Use
If you’ll use your board outside, make it weatherproof. Use a waterproof finish like polyurethane or varnish. This protects the wood from moisture. Also, add a protective coating to the checkers to keep them in good shape.
By following these steps and using traditional methods, you can make a sturdy and attractive wooden checkers board. It’s great for both indoor and outdoor use.
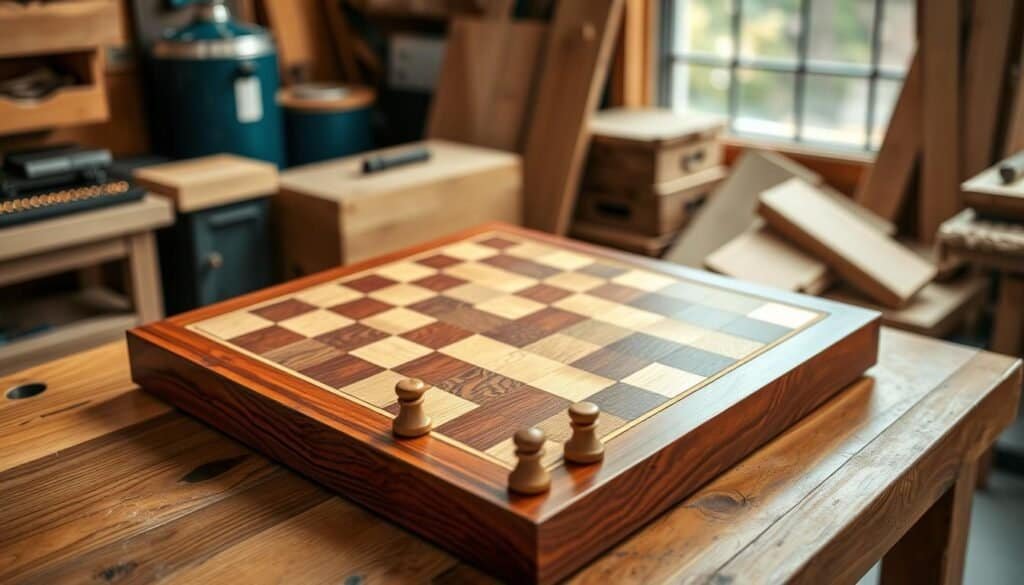
Constructing a Wooden Chess Set
Building a wooden chess set is a fun project that mixes skill with strategy. It’s perfect for those who love woodworking and want a challenge. This project turns into a beautiful piece of art.
Starting a handmade wooden chess set involves several steps. First, you need to design and pick the right wood. Beginners can use pre-made templates to make things easier.
Templates for Beginner Woodcarvers
Templates are key for new woodcarvers. They help make uniform pieces, making your chess set look great. You can find many templates online or create your own based on classic designs.
Choosing the right wood is important. Hardwoods like maple, walnut, and cherry are great because they’re durable and look beautiful.

Using a lathe can make your chess set look even better. A lathe helps you make symmetrical pieces, which is great for pawns and other round pieces.
Building a wooden chess set is not just about making a game. It’s also about creating a wooden sculpture that shows off your skill. Whether you’re experienced or just starting, this project is a great way to improve your woodworking skills and make something special.
By following these tips, you can make a beautiful wooden chess set. It’s a project that brings together the joy of woodworking and the fun of playing chess.
DIY Wooden Ring Toss Game
DIY yard games like a wooden ring toss are perfect for family fun. They can be customized for any age group. This classic arcade game is easy to make and adds fun to any backyard gathering.

To start, you’ll need a few simple materials: wooden stakes, rings, and a base. The wooden stakes can be of varying heights to make the game more challenging. The rings can be made of wood or plastic, and the base should be sturdy enough to hold the stakes firmly in place.
Scoring Systems and Game Variations
You can customize the scoring system to make the game more exciting. For example, you can assign different point values to each stake based on its height or distance from the player. Game variations can include team play or individual competition, making it a versatile activity for different gatherings.
Another way to vary the game is by changing the size of the rings or the distance between the stakes and the players. This allows you to adjust the difficulty level according to the age and skill level of the players.
Portable Design Options
To make your wooden ring toss game portable, consider designing a compact base that can be easily carried to different locations. You can also make the stakes collapsible or detachable, making it easier to store and transport the game.
By following these steps and tips, you can create a fun and engaging DIY wooden ring toss game. It will be enjoyed by family and friends. Whether you’re hosting a backyard party or just looking for a fun outdoor activity, this game is sure to be a hit.
Creating a Wooden Cornhole Set
Building a wooden cornhole set means knowing the right measurements and making it foldable. Cornhole is a fun outdoor game that’s become very popular.
To make a cornhole set, follow certain rules. The board should be 4 feet by 2 feet. It also needs to be 12 inches high at the front.
Regulation Measurements and Specifications
The American Cornhole Association (ACA) has clear rules for cornhole boards. The hole should be 6 inches wide and 9 inches from the top.
The board’s surface must be smooth. Use 1/2-inch plywood and strong lumber for the frame.

When not playing, it’s smart to store the cornhole set easily. A foldable design helps a lot.
To make a foldable board, attach hinges to the legs and frame. This lets the legs fold under the board.
Adding a handle makes carrying the board simpler. This is useful when moving it to storage.
By following these tips, you can build a wooden cornhole set. It will be both useful and easy to store. This ensures it stays a beloved outdoor game for many years.
Crafting a Wooden Marble Run
Building a wooden marble run is a fun project that keeps you entertained for hours. It’s a challenge that helps kids and adults think better and solve problems.
Creating Reliable Tracks and Turns
To make a great marble run, focus on building solid tracks and turns. First, plan out your run’s design, thinking about the space and how complex you want it. Use wooden planks or boards for the base, making sure it’s strong enough for the marble.
For the tracks, you can use wooden strips or buy pre-made ones. When making turns, aim for smooth curves. Sharp turns can make the marble jump off track.

For turns, use a gentle curve to keep the marble moving. You can bend wooden strips or use curved tracks. The goal is to smoothly connect straight paths with turns.
Testing and Troubleshooting
After building your marble run, test it with one marble. Watch how it moves and find any problems. Fix these to make the run better.
If the marble gets stuck or derails, check the track’s alignment and surface. Making a wooden marble run is a great DIY project for kids and adults. With careful planning and testing, you’ll have a fun and educational marble run.
Building a Tabletop Wooden Shuffleboard
Making a wooden shuffleboard tabletop is a fun DIY project. It combines woodworking with classic table games. It brings the excitement of shuffleboard into your home, perfect for family and friends.
You’ll need a wooden board, preferably from smooth hardwood like maple or birch. It should be about 6 feet long and 20 inches wide. Make sure the surface is flat and smooth.

A smooth finish is key for a shuffleboard. It lets the discs slide smoothly. Start by sanding the wood with finer grits of sandpaper, ending with a high-grit sandpaper (220 or higher).
After sanding, apply a finish that highlights the wood’s beauty and provides a slick surface. Polyurethane or a similar water-based finish works great. Apply thin coats, letting each dry before adding the next. Finish with a light sanding to remove dust or minor flaws.
Adding Scoring Lines and Zones
After the finish, it’s time for scoring lines and zones. Use a ruler and pencil to mark the scoring areas. Shuffleboards usually have zones at the far end with lines for different points.
To make the lines stand out, use a fine-tip marker or paint. You can also use a wood burning tool for a rustic look. Make sure the lines are straight and zones clear for easy scoring.
Your tabletop wooden shuffleboard is now ready. It’s a great addition to your game room. The smooth finish and clear scoring zones make the game fun for all.
DIY Wooden Croquet Set for the Backyard
Building a DIY wooden croquet set is a fun project that brings family together. It’s a great addition to your backyard games, providing endless fun for everyone.

Choosing the right wood is key for a durable croquet set. You need woods that can handle the weather and last long outdoors.
Wood Selection for Durability
For your DIY set, use hardwoods like oak or maple. These are tough and won’t rot or get damaged by bugs. Adding a waterproof sealant will make it last even longer.
Softwoods like pine are okay but need more care. Make sure your wood is dry and seasoned well for a stable set.
Handle and Head Construction
The handles and heads of your mallets are important. Use straight-grained hardwoods for the handles for strength. Make the heads from denser woods to handle ball impacts well.
Attaching the head to the handle needs to be precise for a balanced mallet. Use strong adhesives and metal bands for a sturdy build.
With these tips, you can make a fun and sturdy DIY wooden croquet set. It will show off your skills and add charm to your backyard with rustic wooden playground equipment.
Building a Wooden Labyrinth Maze Game
A wooden labyrinth maze game is a fun activity that helps families bond. It challenges players to guide a ball through a maze. This game is great for spending time with loved ones.

To make a wooden labyrinth maze game, think about balance and pivot points. A good maze is hard but not too hard to solve.
Balance and Pivot Point Considerations
The maze’s balance and pivot points are key. It should tilt smoothly, letting the ball move easily. You need to think about the pivot point and balance.
A balanced maze is more fun to play. It moves predictably with player actions. You might need to adjust the maze’s weight or tweak the pivot point.
Adding Handles and Controls
Handles and controls make the game better. Handles help players move the maze. Controls let you change the game’s difficulty or start over.
These features make the game more fun and interactive. Building a wooden labyrinth maze game is a rewarding DIY project. It brings people together and creates memories.
Conclusion: Creating Lasting Memories Through Handcrafted Wooden Games
Building classic wood games is a great way to make lasting memories with your family. DIY woodworking projects help you appreciate handmade games more. You also get to spend quality time with your loved ones.
Games like giant Jenga, tic-tac-toe, and checkers bring families closer. They create a sense of togetherness and friendly competition. These games become treasured possessions, passed down through generations, bringing a sense of nostalgia.
Handmade games offer a unique way to disconnect from screens and reconnect with each other. By crafting these games, you feel a sense of pride and ownership. This is hard to find with store-bought games.
As you keep building and playing these games, you’ll make memories that last a lifetime. Your family will cherish these handcrafted wooden games for years to come.


