Learn how to make furniture that lasts forever without nails or screws. Japanese joinery is known for its strength, beauty, and lasting appeal.
This ancient method has been honed over centuries. It lets craftsmen make stunning pieces that are both useful and beautiful. Exploring Japanese joinery helps woodworkers understand the techniques behind these durable and attractive projects.
Japanese joinery is an art that needs patience, skill, and detail. We’ll look at 10 timeless woodworking techniques. These will help you make strong and beautiful projects.
The Ancient Art of Japanese Woodworking
Japanese woodworking is a mix of tradition, skill, and nature. It has been perfected over centuries. This makes it a unique and respected craft.
Harmony with Nature and Materials
Japanese woodworking values working with nature and materials. Woodworkers pick and prepare wood carefully. They often use it as is to keep its beauty and strength.
Structural Integrity Without Metal Fasteners
Japanese woodworking is known for its strong structures without metal. This is thanks to detailed joinery methods developed over time.

These techniques also make buildings earthquake-resistant and flexible. The joinery allows buildings to move and absorb shocks. This reduces damage or collapse risks.
Aesthetic Appeal and Craftsmanship
The beauty of Japanese woodworking is clear, focusing on craftsmanship. Every detail and cut adds to the piece’s beauty.
Japanese woodworking’s blend of tradition, skill, and new joinery techniques inspires many. It continues to influence woodworkers globally.
Understanding Japanese Joinery: Timeless Woodworking Techniques for Strong & Beautiful Projects
Japanese joinery is all about respecting wood and being precise. It’s a craft that has been perfected over centuries. It focuses on both beauty and strength in woodworking.
Precision and Patience
Japanese joinery is known for its precision. Craftsmen take their time to make sure every cut and joint fits perfectly. This requires a lot of patience and skill.
Working With Wood Movement
Craftsmen in Japanese joinery know how wood moves with humidity and temperature changes. They design joints that let wood move without weakening the structure.

Hand saws and chisels are key tools in Japanese woodworking. They help make precise cuts and joints. This shows the craftsman’s skill and dedication.
Marking and Measuring Tools
Marking and measuring accurately is essential in Japanese joinery. Craftsmen use special tools to make sure joints fit perfectly. This highlights the importance of precision in this craft.
Contemporary Furniture Design
Japanese joinery isn’t just for traditional projects. It’s also used in modern furniture design. Today’s craftsmen mix these timeless techniques with new designs, creating unique pieces.
Architectural Elements
Japanese joinery is also used in building design. It adds strength, durability, and beauty to structures. From temples to homes, it brings a special touch to buildings.
The art of Japanese joinery inspires woodworkers worldwide. It teaches the value of precision, patience, and understanding wood. By learning these techniques, craftsmen can make projects that last forever.
1. Kanawa Tsugi: The Mortise and Tenon Joint
In Japanese joinery, the Kanawa Tsugi is a standout. It’s a traditional joint that has been used for centuries. It creates a strong and beautiful bond between two pieces of wood.

To make a Kanawa Tsugi, you start with careful planning. First, mark where the mortise and tenon will go. Use a marking gauge to draw the sizes, making sure they fit the wood’s thickness.
Cutting and Fitting
After planning, it’s time to cut and fit the mortise and tenon. Cut the mortise first with a chisel or mortise chisel set. Then, cut the tenon to fit tightly in the mortise, paying attention to avoid gaps.
Difficulty Level: Beginner to Intermediate
The Kanawa Tsugi is easy for beginners and intermediate woodworkers. It needs patience and some tool experience, but the steps are simple.
Time Investment: 1-3 Hours
How long it takes to make a Kanawa Tsugi varies. It usually takes 1 to 3 hours, depending on the joint’s complexity and your skill level.
Learning the Kanawa Tsugi is a great skill for woodworkers. It teaches you about traditional Japanese joinery. With practice, this joint will become a key part of your woodworking, adding strength and beauty to your projects.
2. Koshikake Aritsugi: The Housed Dovetail Scarf Joint
Koshikake Aritsugi is a woodworking technique from Japan. It connects two pieces of wood in a strong and beautiful way. This joint has been perfected over centuries.

This technique requires a lot of precision. The angles and measurements are critical. It involves cutting a dovetail shape that fits into a housed area.
The dovetail angle is between 10 to 15 degrees. This angle balances strength and ease of assembly. The measurements must be exact to avoid problems.
Assembly Sequence
Assembling Koshikake Aritsugi needs patience and a plan. First, cut the dovetail on one piece. Then, chisel out the housed area on the other. Bring them together, using a mallet to fit them snugly.
Difficulty Level: Intermediate
Koshikake Aritsugi is for intermediate woodworkers. It’s complex and requires precision. Woodworkers should have some experience before trying it.
Time Investment: 2-4 Hours
It takes 2 to 4 hours to complete, depending on the woodworker’s skill. The project’s size also affects the time needed.
For more on timber frame joinery, check out “timber frame joinery details pdf. It offers detailed guides and plans. These resources are great for learning about Koshikake Aritsugi and other techniques.
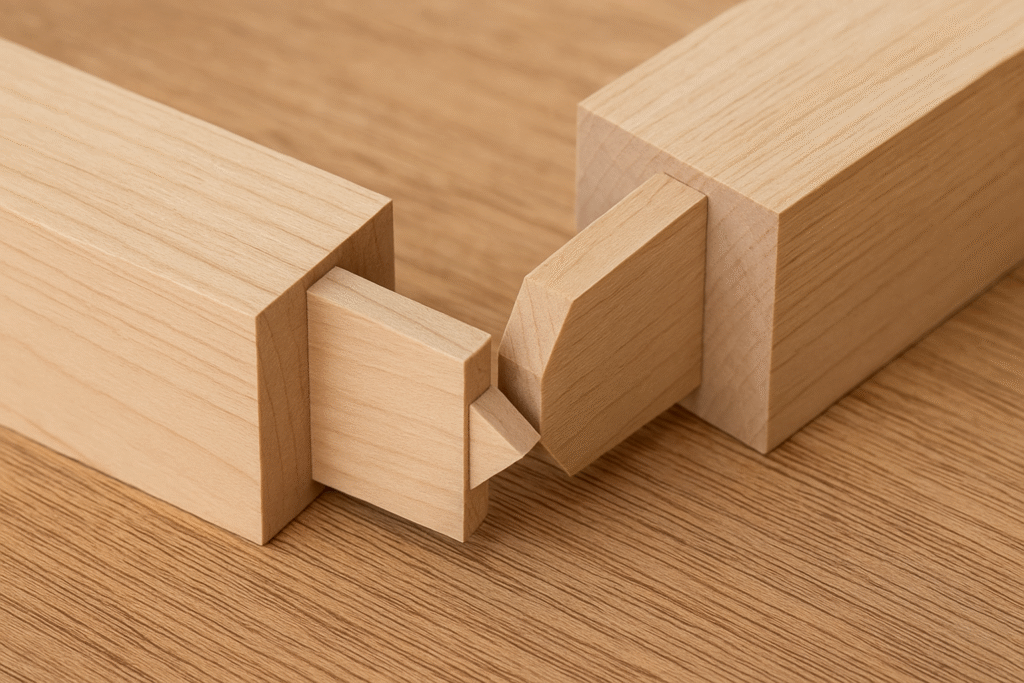
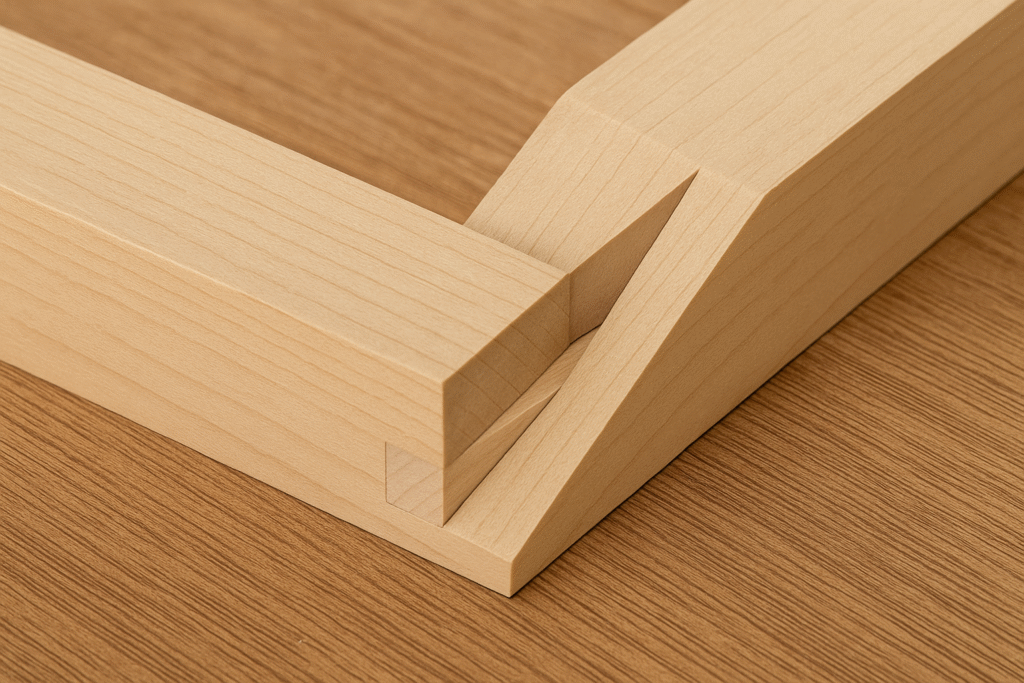
3. Shiho Kama Tsugi: The Four-Way Corner Joint
Shiho Kama Tsugi, or the four-way corner joint, shows the genius of Japanese joinery. It makes strong, beautiful corners in wood, highlighting the art of precise woodworking.
Specialized Cutting Techniques
This technique needs special cutting skills. Woodworkers must cut the wood just right for a perfect fit. They use traditional Japanese tools and know a lot about wood grain.

Getting the Shiho Kama Tsugi right is all about precision. A small mistake can ruin the whole joint. So, woodworkers need a steady hand and sharp eyes for detail.
Difficulty Level: Advanced
The Shiho Kama Tsugi is a hard technique in Japanese joinery. It takes a lot of skill and experience, making it a great challenge for experienced woodworkers.
Time Investment: 4-6 Hours
Making a Shiho Kama Tsugi joint takes a lot of time, usually 4 to 6 hours. The time shows how complex and detailed the joint is.
In summary, the Shiho Kama Tsugi is a stunning example of Japanese joinery’s beauty and strength. Woodworkers who master this technique can make lasting, beautiful four-way corner joints.
4. Kagari Sen: The Blind Tenon Joint
Learning the Kagari Sen blind tenon joint is a big step for woodworkers. It’s a key skill for making beautiful handcrafted furniture. This method, inspired by Japanese joinery, makes a hidden mortise and shapes the tenon for a perfect fit. It creates a strong and attractive joint.
Creating the Hidden Mortise
The journey starts with making the hidden mortise. This part needs precision and attention. Woodworkers use chisels or special tools to dig out the mortise area. The size and depth of the mortise are key for the joint’s strength and fit.

After the mortise is ready, the tenon needs to be shaped and sized. This step requires great accuracy. The tenon must fit perfectly into the mortise without showing from the outside. Woodworkers use marking, cutting, and fine-tuning to get it just right.
Difficulty Level: Intermediate
The Kagari Sen is for intermediate woodworkers. It needs a solid grasp of woodworking basics and some joinery experience. Woodworkers at this level find the challenge of making a blind tenon joint rewarding. It adds elegance to their work.
Time Investment: 2-3 Hours
Building a Kagari Sen joint takes 2 to 3 hours. This time depends on the project’s complexity and the woodworker’s skill. The effort is worth it, as the result is a sturdy and stunning joint. It greatly improves the quality of the handcrafted furniture.
5. Nejiri Arigata: The Twisted Dovetail Joint
The twisted dovetail joint, known as Nejiri Arigata, is a top skill in Japanese joinery. It needs careful planning and skill. This joint shows the woodworker’s talent and adds beauty to any project.

When starting the Nejiri Arigata, being precise is key. The twisted design needs exact cuts for a perfect fit. Woodworkers must plan the angles and sizes, considering the wood type and grain.
Test Fitting and Adjustments
Testing the fit is a vital step for the Nejiri Arigata. It lets woodworkers tweak before finishing. They check the joint’s fit, make adjustments, and ensure smooth assembly.
Difficulty Level: Advanced
The Nejiri Arigata is for experienced woodworkers. It needs skill in cutting and fitting complex joints. Woodworkers should be good at detailed layouts and know how different woods act.
Time Investment: 5-8 Hours
Making a Nejiri Arigata joint takes a lot of time. It can take 5 to 8 hours, depending on the project’s complexity and the woodworker’s skill. This time includes planning, cutting, testing, and final assembly.
In summary, the Nejiri Arigata is a challenging but rewarding project. It requires precision, patience, and a lot of time. But, the end result is a stunning joint that boosts the project’s quality and beauty.
6. Kawai Tsugite: The Impossible Joint
In Japanese joinery, the Kawai Tsugite is a standout. It’s called the “impossible joint” because it’s so hard. It needs a lot of skill and the ability to think in three dimensions.
Three-Dimensional Thinking
Woodworkers must see and make complex cuts for the Kawai Tsugite. It’s not just about cutting wood. It’s about knowing how each part fits together in space.

Getting the Kawai Tsugite right takes careful planning. Woodworkers need to think about each cut’s impact on the whole joint. They must know a lot about Japanese woodworking and how to use it in complex ways.
Difficulty Level: Master
The Kawai Tsugite is for experts only. It needs a lot of woodworking skill and knowledge of Japanese joinery. Plus, patience to make precise cuts.
Time Investment: 8-12 Hours
Building a Kawai Tsugite takes a lot of time, 8 to 12 hours. This time is for cutting, fitting, and planning. It’s to make sure the joint works well and looks great.
The Kawai Tsugite is a big challenge for woodworkers. Mastering it shows great skill and dedication. It makes pieces that are not just useful but also beautiful, showing off Japanese joinery’s art.
7. Kama Tsugi: The Gooseneck Joint
The Kama Tsugi, or gooseneck joint, is a key part of Japanese joinery. It’s known for its detailed design and strong build. This joint shows the beauty and skill of traditional Japanese woodworking.

Making the Kama Tsugi involves creating a curved shape that fits perfectly into a recess. It takes a lot of precision and patience. The curve must be smooth and exactly right.
Woodworkers use hand tools and careful measurements to make this joint. They aim to create a joint that’s strong and looks great.
Fitting and Adjusting
Getting the Kama Tsugi joint right is a careful process. It needs a lot of attention to detail. The joint must be tested and fine-tuned until it fits perfectly.
This can take a few tries, needing patience and small adjustments until it’s just right.
Difficulty Level: Intermediate to Advanced
The Kama Tsugi joint is considered hard to do. It needs a lot of precision in making the curved shape and ensuring a tight fit.
Woodworkers trying this should have some experience with complex joints. They should be okay with the level of detail and precision needed.
Time Investment: 3-5 Hours
Making a Kama Tsugi joint takes a lot of time, usually 3 to 5 hours. This depends on the design’s complexity and the woodworker’s skill.
While it takes a lot of time, the result is worth it. The joint adds strength and beauty to the finished piece.
8. Aikaki: The Dovetail Wedged Joint
Aikaki, also known as the dovetail wedged joint, is a traditional Japanese joinery technique. It’s known for its strength and beauty. Woodworking fans and pros love it.
Making an Aikaki involves creating a dovetail joint and adding wedges for extra strength. This process needs careful attention and patience. The dovetail and wedges must fit perfectly for the joint to work well.
Choosing the right wood for the wedges is key in Aikaki. The wood should match the pieces being joined. This ensures the joint is strong and looks good together. The grain of the wedges also matters for the joint’s strength.
Grain Direction Importance
Grain direction is very important in Aikaki. The wedges’ grain should match the surrounding wood. This helps spread stress evenly and makes the joint stronger.
Difficulty Level: Intermediate
Aikaki is considered intermediate in difficulty. It needs a good grasp of woodworking and some joinery experience. Those with DIY carpentry skills will find it challenging but rewarding.
Time Investment: 2-4 Hours
Creating an Aikaki joint takes 2 to 4 hours. This time depends on the project’s complexity and the maker’s skill. The effort is worth it for the joint’s beauty and strength.
In summary, Aikaki or dovetail wedged joint is great for those into wood joints and DIY carpentry. Its mix of strength, durability, and beauty makes it a top choice in woodworking.
9. Shachi Tsugi: The Splayed Scarf Joint
Shachi Tsugi, or the splayed scarf joint, is a complex Japanese joinery method. It needs precision and skill. This technique connects two pieces of wood, making a strong and beautiful joint.
The Shachi Tsugi is great for big constructions because it can handle stress well. It cuts the ends of two timbers at an angle. This makes them fit together perfectly.
Angle Calculations
Getting the angle right is key for a successful Shachi Tsugi. You need to know a lot about geometry and the project’s needs.
The angle depends on the wood type and how much weight the joint will hold. Being precise ensures the joint fits well and works as it should.
Securing the Joint
After figuring out the angles and cutting the timbers, securing the joint comes next. This is done with wedges or pegs, which are inserted carefully to hold the joint in place.
This step not only strengthens the joint but also makes it last longer. So, the Shachi Tsugi is a solid choice for many woodworking projects.
Difficulty Level: Advanced
The Shachi Tsugi is an advanced joinery technique. It’s hard because of the angle calculations and the need for precision in cutting and assembling.
Woodworkers trying this should know Japanese joinery well and understand the tools and materials needed.
Time Investment: 4-6 Hours
Making a Shachi Tsugi joint takes a lot of time, usually 4 to 6 hours. This depends on the project’s complexity and the woodworker’s skill.
This shows the dedication and care that Japanese woodworking is all about.
10. Mechigai-dana: The Interlocking Joint
The Mechigai-dana is a complex interlocking joint from Japanese woodworking. It’s known for its strength and beauty in handcrafted furniture.

Creating this joint needs a lot of precision and patience. It involves a detailed process starting with marking the joint.
Marking Out the Joint
First, woodworkers must mark where the joint will be cut. They use special tools for this precise step.
After marking, the next step is removing waste and refining. Removing waste is a careful process. It uses chisels and other tools to remove excess wood without harming the area around it.
Then, the joint is smoothed out for a perfect fit.
Difficulty Level: Intermediate to Advanced
The Mechigai-dana joint is considered hard to master. It requires a lot of precision and skill.
Time Investment: 3-5 Hours
Making a Mechigai-dana joint can take 3 to 5 hours. This depends on the woodworker’s skill and the design’s complexity.
In conclusion, the Mechigai-dana interlocking joint showcases Japanese woodworking’s dedication to detail and quality.
Common Mistakes and How to Avoid Them
Japanese joinery is about avoiding mistakes as much as it is about techniques. Knowing these common errors can greatly improve your carpentry work.
Using proper reference surfaces is key in Japanese joinery. It helps ensure your cuts are accurate, setting the stage for successful joints.
Double-Checking Before Cutting
Always double-check your measurements before cutting. This simple habit can prevent expensive mistakes and save material.
Keeping Edges Sharp
Sharp tools are essential for clean cuts and avoiding wood damage. Dull tools can cause uneven joints and make your work harder.
Using the Right Tool for the Job
Japanese joinery requires specific tools for each task. Using the right tool makes your work more efficient and of better quality.
Understanding Wood Movement
Wood changes size with humidity changes. Knowing this and planning for it is key to prevent warping or cracking.
Proper Seasoning and Acclimation
Seasoning and acclimating wood properly is critical. It helps prevent warping or cracking, keeping your projects stable and durable.
Avoiding these mistakes can improve your Japanese joinery skills. This way, you can create beautiful, lasting carpentry projects.
Essential Tools and Woods for Japanese Joinery
To master Japanese joinery, you need to know the key tools and woods. This traditional craft is famous for its detailed joints and precision. It requires specific tools and materials for strength and beauty.
Japanese saws are known for their precision. They cut on the pull stroke, giving more control and less waste. This cutting style is key for the detailed cuts in Japanese joinery.
Specialized Chisels and Marking Tools
Specialized chisels and marking tools are vital for Japanese joinery’s precise joints. These tools work well with the wood, helping craftsmen achieve the needed details.
Adapting Western Tools for Japanese Techniques
Many craftsmen use Western tools for Japanese joinery, even though traditional Japanese tools are preferred. Knowing how to use Western tools can be helpful, even for those familiar with Western woodworking.
Essential vs. Nice-to-Have Tools
It’s important to know the difference between essential and nice-to-have tools for Japanese joinery. Essential tools include Japanese saws, chisels, and marking gauges. Nice-to-have tools might include specialized jigs and fixtures.
Softwoods vs. Hardwoods
The choice between softwoods and hardwoods depends on the project’s needs. Softwoods are good for structural parts, while hardwoods are better for visible parts because of their durability and beauty.
Traditional Japanese Woods and Western Equivalents
Traditional Japanese woods like hinoki (Japanese cypress) and sugi (Japanese cedar) are highly valued. For craftsmen outside Japan, knowing Western equivalents can help in choosing the right materials.
Workbench Requirements
A good workbench for Japanese joinery should be sturdy and stable. It should be the right height and size for the craftsman, making work efficient.
Lighting and Space Considerations
Good lighting and enough space are key for Japanese joinery’s precision. Proper lighting helps see the fine details, and enough space allows for easy tool and material handling.
Conclusion: Preserving the Legacy of Japanese Woodworking
Japanese woodworking is a timeless craft passed down through generations. It inspires woodworkers worldwide. The techniques and joinery methods show the skill and ingenuity of Japanese craftsmen.
Woodworkers can make strong and beautiful projects by mastering these traditional techniques. Preserving Japanese woodworking is more than keeping a tradition alive. It’s about innovating and exploring what’s possible with wood.
Exploring Japanese woodworking reminds us of the value of timeless techniques. These techniques help create projects that are both functional and beautiful. Whether you’re experienced or new, Japanese woodworking offers a lot to discover.


